During these weeks, we have been working mainly in two different areas. On one hand, we have improved YaST services management capabilities, adding support for on demand services and making the user experience slightly better. On the other hand, we are still working in the new storage layer, extending it to support Xen virtual partitions and fixing BIOS MD devices handling, among other things.
Last but not least, our bug fighting squad (do you remember squads, right?) have fixed quite some bugs across our full stack.
So let’s have a tour to recap some highlights from these sprints.
Services Management Gets Some Love
The team is investing quite some time improving the services management area. In the past, YaST was adapted to play nicely with Systemd (which replaced the old runlevel-based init system). However, there was a lot of room for improvement, as Systemd added some new features when it comes to services management that were not supported in YaST at all.
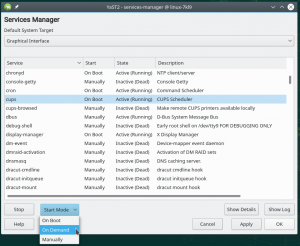
To explore these changes, let’s start by having a look at the new services manager user interface.
At first sight, you may have spotted some changes: there is an Start Mode menu button where the Enable/Disable used to be; new Apply or Show Logs buttons have been added; the Start/Stop button has been replaced by an Start (or Stop) one… Ok, let’s describe these changes one by one.
Perhaps the most relevant update is the support for socket activated services. But you may be asking what a “socket activated service” is, right? In a nutshell, these are services that are started on demand. For instance, the printing service could be started only when you want to use the printer. And that’s what the Start Mode button is all about. For instance, you may want the printing services to be started only when needed (On Demand) and YaST will take care of setting up Systemd units in order to do so.
Another interesting feature is browsing services logs. Beware that this
button will be available only if yast2-journal is installed because it
uses the browser provided by this package.
And browsing the logs brings us to the new Apply button. Sometimes, it may be useful to Start a service and check the logs looking for potential problems. In the past, the changes were applied when the OK button was pressed but, unfortunately, the services manager was then closed. Now, with the Apply button, you can ask YaST to made those changes for real without closing the services manager (and check the logs or keep adjusting services).
But that’s not all! Among other small changes (like fixing bug #1080738) we are still improving the UX for this services manager.
Make the Xen virtual partitions great again
Rewriting a piece of YaST that is 20 years old is a never-ending source of surprises. When we though that Storage-ng did already support all the storage technologies handled by the old storage stack, we just found that we had left something behind.
When setting a Xen virtualization environment, it’s possible to
define block devices that are seen and named like partitions in the Xen
guest, but are in fact disks (or almost-disks, since they cannot be
partitioned by regular methods). In other words, the Xen guest can see
some block devices called e.g. /dev/xvda1 and /dev/xvda2 without a
corresponding /dev/xvda.
From the YaST point of view, you can do whatever you can do with a
partition (format it, mount it, etc.), except you can’t delete them or
create more (since they are not backed by a disk, from the perspective
of the Xen guest). We call those devices “Xen virtual partitions”. The
old storage stack used to pretend those devices were just plain
partitions of a made-up /dev/xda disk that was not there in the system
but still appeared in the Partitioner and in the AutoYaST profile. The
new stack simply contained no support at all for Xen virtual partitions.
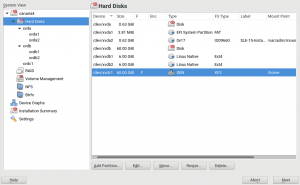
We fixed that during the last sprint, making the feature available on the SLE-15 installation process thanks to the installer self-update feature. So either if your Xen guest runs a fully up-to-date version of SLE-15, Leap 15.0 or Tumbleweed or if you are installing SLE-15 with access to the installer self-update repositories, virtual partitions are visible in the Hard Disks section of the Partitioner.
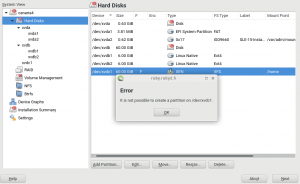
It works in a in a similar way to the old (pre Storage-NG) Partitioner,
but without artificial disks to group the virtual partitions. See the
following screenshots in which xvda is a DVD, xvdb a real disk and
xvdc1 a XEN virtual partition (there is no bogus xvdc added by
YaST).
Only the Edit button really works as expected, allowing the user to mount and/or format the virtual partition. The other buttons just show the appropriate error for the different unsupported operations.
I want that on my Leap 15.0 installer
As a side note on the Xen partitions topic, it’s worth mentioning that the self-update feature of the installer is always available for all YaST-based distributions. But, unlike SLE, openSUSE doesn’t offer an official self-update repository, implying the feature is effectively disabled by default in openSUSE Leap. Does it mean that if you want to install Leap on top of a Xen virtual partition you will have to wait for Leap 15.1 or switch to Tumbleweed? Not exactly.
If you really want to use the latest YaST features during the openSUSE Leap 15.0 installation process, there are a couple of ways to achieve it. For example, to install (or upgrade) using the Leap 15.0 Live images. The live images are refreshed once in a while, so they can contain an installer that is more up-to-date than the installer in the Leap 15.0 normal ISO. There are also ways to use the self-update feature with unofficial (and unsupported) repositories. For a summary of all the options, check this comment at Bugzilla. Users of SLE should not need any of these hacks, since there is an official repository for the installer self-update mechanism ensuring SLE15 can always be installed with updated version of all the crucial packages.
A New Widget To Manage Services
Did you think that services management were confined to the services
manager? Of course no. ![]() As you may know, there
are serveral YaST modules that allow our users to set up several
services like DNS, DHCP, Samba, etc. All these modules offer a way to
configure how and when those services should be started.
As you may know, there
are serveral YaST modules that allow our users to set up several
services like DNS, DHCP, Samba, etc. All these modules offer a way to
configure how and when those services should be started.
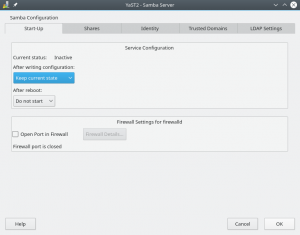
So as part of the effort to improve the services management experience, we have rolled out a new widget which offers some benefits:
- Allows setting a service to be started On Demand.
- Offers a consistent an unified interface accross all modules.
- It is able to handle cases where several services are involved (like
yast2-samba-serveroryast2-iscsi-client).
By the way, we have adapted all these modules to use the new and shiny widget.
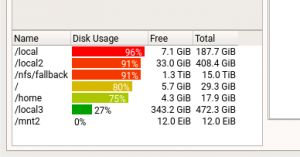
Better Handle Large File Systems in libyui
We fixed an issue with disks larger than 8EiB in the last sprint. However, the fix was intended for SLE12 and SLE15 maintenance update so we could not do big changes and we fixed only the most important parts.
For SLE15-SP1/Leap 15.1 and openSUSE Tumbleweed we can do more changes so we did some backward incompatible improvements.
Originally the size was implemented using long long data type which is
a 64-bit signed integer (with the maximum value 8EiB). We switched to
the Boost multiprecision C++ library which implements arbitrary
precision integers. It works like the Integer class in Ruby which
adds more bits to the data when needed.
Of course, it still depends on the limits in the underlying libzypp library which uses a 64-bit signed integer but with 1KiB unit, so the limit should be 8ZiB. With this change we are prepared even for more.
Additionally we added more units for converting to a string representation. Originally it used TiB units which resulted in too big numbers, now the EiB sizes are displayed using the EiB units as expected.
Moreover we added support for writing unit tests, evaluating the code coverage and reporting the it to coveralls.io. With this support we were able to write the very first unit test in libyui! The code coverage is now at the embarrassing 2% but we have just started!
Rubocop Check Speed Up
In the previous blog post we reported that we had improved running
the unit tests in the yast2-storage-ng package. The speed up was based
on parallelizing the execution and using all processors. This time we
have improved the Rubocop check.
Normally Rubocop scans the directory for the files to check and then processes found files sequentially. And this might take very long time if there are hundreds of files to check.
Similarly as in the previous speed up we take advantage of the available processors and run multiple Rubocop instances in parallel. The implementation is a bit more complicated as Rubocop itself does not support parallel scan at all. But it is possible to evaluate the checked files, split them into the groups according to the number of processors and start a separate Rubocop instance for each group in parallel.
If you are interested in the details or you want to use parallel Rubocop
also in your project then check the implementation in the
yast-rake Ruby gem.
Of course, this improvement has an important impact in the yast2-storage-ng package where Rubocop needs to check over 600 files. Here you are the numbers:
- Running Rubocop locally (with hyperthreading enabled):
- ~3.6x faster on an older quad core CPU (from 44s to 12s)
- ~6x faster on a new eight core CPU (from 35s to 6s)
- At Travis: ~1.5x faster (from 69s to 47s), that’s the maximum possible because Travis has about 1.5x CPU build power
As you can see, for big projects the speed up is very good on local system and even at Travis it is still nice.
What’s next?
Sprint 61 is already running and the new storage layer and services management are again the areas where we are focusing an important part of our resources. Hopefully, in around two weeks, we will publish what we have achieved this time.
Stay tunned!
