How to Write a New Post
A short introduction about writing new blog posts
A short introduction about writing new blog posts
There are basically two ways how to write a new blog post:
_posts directory - follow the same file
naming schema and use a similar YAML header like in the other posts. (It
is recommended to generate the post template online, see the previous section.)
The YAML front matter values are partially documented
here and
here and even
here./assets/images/blog/<YYYY>-<MM>-<DD> subdirectoryGenerate Template buttonPreview changes tab to see the rendered Markdown
Create a new branch for this commit option at the bottom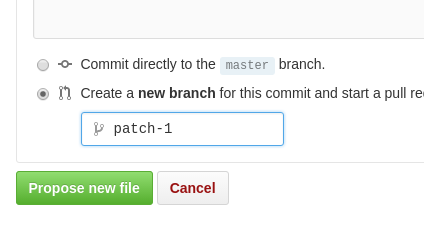
Upload file button in the repository browserThe site uses the Jekyll framework for generating the pages and Kramdown syntax (a Markdown flavor) for the blog posts.
Here you can find the relevant documentation:
There is a blog_img.md
include file which contains a helper for rendering the local images. For the
external images use the usual Markdown syntax, see below.
Each blog post should contain the relevant images at the
/assets/images/blog/<YYYY>-<MM>-<DD> subdirectory, the date in last part
should be the same as in the post file name.
The helper supports several use cases:
{% include blog_img.md alt="Alt text" src="file.png" %}
{% include blog_img.md alt="Alt text" src="file.png" attr=".thumbnail" %}
{% include blog_img.md alt="Alt text" src="file_small.png" full_img="file.png" %}
For external images (hosted outside the blog) use the usual ![]() Markdown
syntax. If you want to use a thumbnail for an external images use the
Kramdown attribute extension:
{: .thumbnail}
See more details in the documentation.
Build the link URL using the post_url helper followed by post file name
without the .md suffix.
[old post link]({{ site.baseurl }}{% post_url 2015-12-15-let-s-blog-about-yast %})
Use the usual fenced code blocks just like at GitHub:
```ruby
puts "Hello world!"
```
is rendered as
puts "Hello world!"
or this example
```xml
<foo bar="yes">baz</foo>
```
is rendered as
<foo bar="yes">baz</foo>
Use emoji shortcuts like at GitHub: :smiley: ![]() ,
, :wink: ![]() ,
,
:+1: ![]() ,
, :sparkles: ![]() …
…
See the emoji cheat sheet page for the complete list.
Install Jekyll and the needed libraries using bundler:
bundle install --path .vendor/bundle
Build the pages:
bundle exec jekyll build
The generated HTML pages are saved into the _site subdirectory.
To avoid rebuilding the pages manually after each change you can run the Jekyll
server with the --watch option:
bundle exec jekyll serve --watch
This will automatically rebuild the pages whenever a file is changed. This also runs a web server at http://127.0.0.1:4000/ so you can browse the generated tree.
Travis CI runs some tests when a commit is pushed to the GitHub repository or when a new Pull Request is opened.
Install the needed dependencies first
sudo zypper install aspell aspell-en aspell-devel
Then install the needed Ruby gems if you have not already done that
bundle install --path .vendor/bundle
And run the checks:
bundle exec rake